

Funky Junk Interiors and Mustard Seed Creations!
This week, Miss Mustard Seed is going to be talking about furniture stripping. I'm such a cheater and always tend to use shortcuts so I look forward to hearing how a pro handles the task.
This week on Funky Junk, we're diving into pretty pictures. :)

~ Blog Photography 101 ~
Great shots from a point and shoot
Are you ever annoyed with dark interior pictures? How about unfocused or crooked? Even with all those elements in check, ever wonder why your pictures just 'don't 'have it?'
I've long wanted to talk about this topic. As a weekend link party host, I visit ALOT of blogs with fantastic projects. As much as I enjoy visiting, there are times that I know some projects can be enhanced even more than shown, by a few VERY SIMPLE photography tricks.
I realize we're all running blogs, not submitting photos to high end magazines and contests and such. However, I'm sure you also realize, you yourself are more prone to be drawn towards a post or project that has well lit, clear photos. So why not have that be you too?
Why do you think your photos aren't the best?
Excuse #1: I have a cheap camera

What's that? You only have a little goofy point and shoot so you can't possibly have good photos? Did you notice what I called this seminar? :)
I'm here to tell you, you do NOT need the fanciest camera out there. I use this simple Canon A650 at about $300 from Costco. Probably down to $50 now. :) While I'd love a higher end variety one day, I'm getting all I can out of this little guy. I've also seen many poor photos out there with those using GOOD cameras, so don't let the type of camera you have dictate your end result.
True, there are really crappy cameras out there. However if your camera has a few settings on it to play with, I guarantee, learn a few of those settings and follow these steps and you'll improve your photos 1000%.
Excuse #2: I'm not a professional photographer
Please know, I am no pro but I do have an eye for what I like to see. I view taking a picture to buying a picture. Would I buy a picture that looks like what I see through the lens? If the answer is no, I move around until I see the picture as something I'd desire to keep. I'll teach you these tricks as well.
And I do my homework. Online searches for info, asking friends for advice and practice practice practice until I solve a problem. If pictures are fuzzy, poorly lit, crooked or out of focus, there's a reason and it's nearly always fixable.
If you'd like to improve your blog photos, this mini 5 part seminar is for you!


~ 5 steps to great pictures ~
1. Keeping your camera ROCK STEADY.
2. Proper lighting.
We'll go over some handy tips on how you can get some extra light into those dark interiors.
3. How to shoot with good angles and backgrounds.
You can greatly enhance ANY photo with a few easy tricks.
4. Using photo enhancing software.
I would never publish a picture that wasn't touched up in Picasa first. You'll soon see why.
5. Getting to know the settings on your camera.
Options are there to utilize. So find your manual and try a few.
Assignments
Yup! After each session, I'm going to give you an small easy assignment so you can test the new theory for yourself. The following week I'll be asking you how it worked out so I hope you'll be ready. :) If you'd like to actively take part and desire to post about your findings on your blog, feel free to add the workshop button in your post so others can climb on board and see where you're learning your wealth of new info from. xo :)
It's so hard not to dive into each of these topics in full right from the get go! IMO they are ALL very important and one can't be without the other. So let's just touch on one this week, and if there's continued interest in the topic, I'll run another tip for next week.
~ 1. Keeping your camera rock steady. ~
Rule: Your camera must NOT MOVE
Why not?
Your shutter takes it's dear sweet time when taking a picture. The dimmer the room, the longer the shutter stays open, bringing in more light to your camera.
While it's true your shutter works much quicker when outdoors, movement matters a great deal when indoors. There just isn't enough natural light, so the shutter is delayed, which is a big problem where movement is concerned. You move, you blur your shot. Taking a breath at the wrong time is all it takes to ruin a picture.
This rings especially true when using a point and shoot. The fancier cameras have lenses that help you deal with camera shake. But we do not. So let's read on!
This rings especially true when using a point and shoot. The fancier cameras have lenses that help you deal with camera shake. But we do not. So let's read on!
How to keep your camera steady
1. Use a tripod if you have it.

Pull the tripod out of the closet and start using it. I move around so quickly with shots, I don't even screw the camera onto the platform. I simply sit the camera on top, using it as a base, exhale, hold my breath, then click. With. Every. Shot. I. Take.
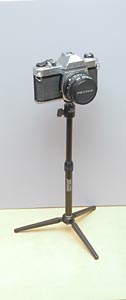
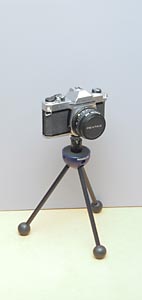

Did you know you can also get tabletop tripods? I WANT one!
2. Use any still object to stabilize your camera.


No tripod? No problem! For both these shots,the camera sat right on the table for complete stability, providing a unique photo opportunity as well. Simply tilt your camera upwards and you have yourself a new take on your topic.
For tabletop shots where you desire abit more camera height, set your camera on top of a cup or yogurt container. If you need a standing up photo, park your camera on a box on top of the kitchen table, the arm of the sofa, or the back of a chair. Anything stable will work!
No stuff to prop on?

Here's a 10 second video on a few hand tips - excellent!
3. Body tricks to keep your camera still
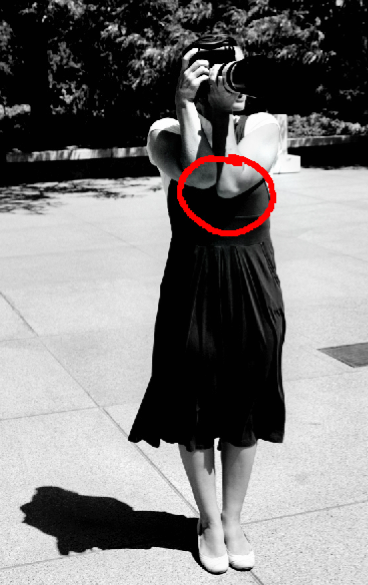
Elbows in, hold your breath.
by
Digital Photography School.com
Assignment
For the rest of the week, try propping your camera on anything and everything while clicking. Remember to set it down, exhale, hold your breath, and click. Next Wednesday, I'll be asking you for your feedback on if you noticed a difference. Feel free to create a post on a before and after that you can display the url within the comments if you wish. :)
Me ~ "So Miss Mustard Seed, you're a pretty avid photographer yourself. Any tips on this given topic you can share?"
MMS ~ "“Donna, the information you are sharing is like gold. I have always had an interest in photography and it increased when I took an SLR photography class a few years ago. I learned how the film speed, shutter speed, and aperture related to one another to get the shot I wanted.
Anyway, I learned very early in that class that using a tripod or holding your camera steady is imperative to clear shots. I personally am too impatient most days to get my tripod out, so I tuck my elbows in tight, lean against a wall and hold my breath. Ha! When I write it out it sounds like a Pilates move. Most of the time that does the trick. I also use a Speedlight flash with a diffuser to brighten up my pictures on gray days.
I have a few tips if you currently have a point-and-shoot and you want to purchase a digital SLR.
First of all, research and pick the brand you want. Brand is important, so your equipment can grow as you grow as a photographer. I purchased a film SLR several years ago and went with Nikon. Every Nikon lens ever made has the same connector, so they will be compatible with any other Nikon camera. I purchased two lenses and a Speedlight flash with my film Nikon SLR and when I wanted to upgrade to a digital SLR, I only had to buy the body. If I ever want to upgrade my camera, I just have to buy another body and my old lenses will still work.
The second tip is to buy from a credible store. There are LOTS of scammers selling cameras on the internet. Watch out for “gray market” and US Made, instead of USA Made. You want a camera that has a USA warranty or you’ll be in a pickle if you ever need to get it repaired. Just do your homework and buy smart.
Third, you don’t need the biggest and best. The lowest end digital SLR will have all of the features an amateur photographer needs. I also purchased a Nikon certified refurbished camera body and that saved me over $100. It looked like it was brand new when I got it and it is still covered by a warranty.
And lastly, buy an extra battery. I go through my battery in about a week and it is wonderful to be able to change it out and keep on snapping. It was a great buy.”
So what do you think?
Does this series interest you enough to continue? Is there something else you'd like me to attempt to cover that isn't listed? Desire a mix up of topics or hack at this one until done?

Make Mine Beautiful's workaprons are on sale!
Click HERE to check it out.
Next Wednesday is the Work Apron Giveaway Event!
Don't miss it!
Yes! Please, please, please keep going! This is something that I've definitely struggled with. I'll be trying your technique this week! Thanks for the workshop! :)
ReplyDeleteThanks so much for this series. I have a point and shoot and have been trying to take better pictures. I do the "hold the breath thing" but need to learn other tricks. I'll be trying these this week. Thanks for your help.
ReplyDeleteYes, yes, yes! I'd love you to continue this series!
ReplyDeleteI voted for this one, I so need camera help! Thanks Donna!
ReplyDeleteOh yes, I have not been able to find a class in my area and even though I have the manual, I need more instuction than that for my adjustable P & S. Thank you
ReplyDeleteYeah! Thanks for doing this series...I will surely do my homework.
ReplyDeleteI will be doing my homework and hope to post next week. We could all use some helpful hints!
ReplyDeleteI completely agree! All except with Picasa because there are actually better (free) programs out there to enhance your photos. But other than that, I think you're spot on! I just cringe when I see blogs (especially ones that are selling things) that have glaring problems that could have been easily fixed!
ReplyDeleteI've ALWAYS wanted to take good pictures and know my blog is one of those that could be greatly enhanced by better pictures so YES, please keep with this!
ReplyDeleteVery cool all! Glad there's interest.
ReplyDelete#8. Courntey, pipe in anytime girl! We need some pro's opinions big time. (Courtney is a photographer) I'd appreciate your input!
FJ Donna
Keep going. I'm with you on this one!!! I voted for this, too!
ReplyDeleteThis is fantastic! I was just thinking on my new post of my kitchen cabinets tonight that my pictures just.don't.do.it.justice! And that stinks. I think faux is so hard to photo. I need all the help I can get in this area! Keep going!
ReplyDeleteGreat tips! I would love to hear more....I'll be holding my breath with arms in for my next photo! :)
ReplyDeleteThanks for tip #1. Can't wait to read more...I need all the help I can get.
ReplyDeleteHi Donna - I have a P&S also that is about 6 years old. I have to manually open the shutter with my finger and the battery door is duct taped on. With all of its problems, if I pay attention I get some great shots. I love your series and look forward to following it.
ReplyDeleteThnanks
I took your advice and downloaded Picasa a while back, Donna, and I am completely hooked!
ReplyDeleteI've been working on the "holding still" thing. Do you think my neighbors were impressed with my dedication when they saw me lying on my driveway trying to shoot a hyacinth blooming in the morning light? Or am I officially That Crazy Lady now?
Great topic Donna! I too hate to see great projects wasted by bad photography. Can I add a little tip to the mix. If you have your camera steady on a surface and it is really dark inside or the extra lighting is messing with the colors (getting everything too yellow for example). Just turn off that light and turn on the timer function. That timer function works great for keeping the camera absolutely still, because in really dark conditions even pushing the button can cause a shake. Use the timer function! It works (with fancy DSL too ).
ReplyDeleteMarianne, that's a fabulous tip! I would never have thought of that. I can't wait to try it! Tomorrow even. :) Tripod and timer, here I come!
ReplyDeleteAnd a gold star for That Crazy Lady!! You'd fit right in over here. :)
#15 Diane, my last camera had the duct tape holding the batteries in too. That stuff rocks! Now be real good so Santa will hear your plea for a ductless model this Christmas. :)
FJ Donna
Keep going with the series. Well written and all great advice. I just got a CoolPix by Nikon. A definite point and shoot and it takes great pics and has a place where I can attach it to a tripod. I am going to try the "sit on a table" tricks. Thanks for that tip!
ReplyDeleteHugs
SueAnn
Great post! I have a nice Canon 500 something with a bunch of settings that I have never even tried! I have determined that it isn't my camera, my terrible photography is because of me. I will take your suggestion and actually experiment with the settings!
ReplyDeleteYes! I am a newer blogger and truly appreciate this! Keep it up! Thanks
ReplyDeleteThis is a great topic, Donna, and one I will most definitely be following eagerly! I am a shaky person to begin with so I have a double whammy against me with pictures. I'm okay when the flash is on, but when I shut it off {because the pictures look too whited out}, they are blurry. I'm also going to look into Picasa. I'm going to try setting the camera on something. I have a little tabletop tripod ~ maybe I'll actually use it!
ReplyDeletewow, look at that, very creative and inspiring, I wish I could design something like that
ReplyDeleteIt is a never ending task, great photos. Thanks for this seminar!
ReplyDeleteYES keep the series going please I need all the help I can get.
ReplyDeleteI will be trying this. I usually just lean and hold my breath. :) Lighting is my biggest problem, since I have areas of the house that are always in the shadows.
ReplyDeleteHi, Donna,, definitely interested in seeing more on this.. my pictures are definitely lacking,,Thanks
ReplyDeleteThanks for these pointers. It's very hard to get photos in my house. House is dark but lots of windows so pictures are glared. Doesn't make sense. Need lots of Help :( jearls
ReplyDeleteOh yes please keep going!!! Always looking for tips!!
ReplyDeletePlease do continue this series. I've already taken my tripod out of the closet and put it in my car. Thanks.
ReplyDeleteGREAT post! These are such great tips. I think I'll put a tripod on my birthday list. :)
ReplyDeleteI am digging out my tripod--thanks for the great post!! oh...btw...my heart did a little skip-di-da-do-dah when I saw your Fort Langley Pic--I grew up there!! Small world! Love the antique mall right across from the IGA :)
ReplyDeleteI have a point and click and nothing ever turns out as great as I'd like!!! Thanks so much for running this series!!! Can't wait to get back Wednesday and see everyone's progress!
ReplyDeleteJust found you today via Willow Decor and her mention of SYTYCD. Spending much time when I should be working but Love Your Style! Please continue the camera info, I have SLR that I hung up cause I didn't like my pics.! Good luck on White!!
ReplyDeleteI so appreciate this series. I think good photography is one of the things that sets some blogs apart from others - I work hard on mine and am always ready to learn more!
ReplyDeleteYES! Keep on with this series please!
ReplyDeleteI finally bought a cheapo tripod at Walmart for like $10. I'm still learning to use it though.
And I got one of those halogen dual work lights and have played around with it too, but I can't seem to get one to face completely down. I think perhaps I was using it in a room that prolly didn't need extra light (south facing on a sunny day with big windows). I'll keep trying. I hate the shadows...could it be that my ceilings are so low that it's too much light?
*sigh* I'll be reading your posts diligently!
I agree, keep the tips coming on this topic.
ReplyDeleteGreat tips! I'm still learning and seriously need to sit down and LEARN my camera. My house is like a bat cave and my pics suck. I have a great camera now so no excuses either! I'll work on my assignment :).
ReplyDeleteLove the Blog- I too, get so excited to start a project I rarely read directions or do it the way that is intended to be done.. The excitement of how it will turn out takes over.. Love Your Blog... SO Much Inspiration...
ReplyDeleteKarryann
Great series plan. Keep it up! I love taking pictures but I really don't like reading manuals. I will work on it though as I don't like bad pictures!
ReplyDeleteYes, I will love this series! I'm going back right this minute to read it all again. Thank you!
ReplyDeleteI'll be watching for more posts in this series. Thanks. I also love your creative decorating- especially how you take "junk" and make it beautiful.
ReplyDeleteomg keep this going my pics need to improve ;).i have several tripods but yet to use one and my camera is for blonds geez dont want to read the manuel every time i use it so got a kodak yrs ago not the best but what i could afford at the time. its almost bullet proof opperater error only will upgrade at some point.
ReplyDeleteI am super excited about this series.
ReplyDeleteYes, yes, yes!!! Please do continue the series on how to take good photos with a point and shoot camera!! I really need this! Thanks!!!
ReplyDeleteMichelle
Oh yes PLEASE keep going! I am learning the steady part...I am excited to learn more about lighting! My flash is STRONG and I think that is supposed to be a good thing...but I get flash glare on EVERY THING! Plus I think If I used my flash in a better way I could get some cool effects! I will be back for more lessons FOR SURE!
ReplyDelete~Bridgette
Certainly...more, more, more! I've already tried new ways of taking pictures since I've even discovered blogs, but I still want to learn more!!
ReplyDeleteabsolutely fantastic tutorial! Thanks so very much for all that you share! Please accept my invitation to drop in at my place one day soon when you get a moment! until later...
ReplyDeletethanks donna,
ReplyDeletei have linked you in my sidebar...we can all use extra help in the photography area. i took classes in high school but have since forgotten most of what i learned. of course it is a bit easier with the point and shoot cameras we have today.
i asked for a monopod for Christmas and it is an awesome tool as well. one can find them at wally world for a good price (under $13).
~judi ;)
oh! i love it! i need it! thanks for the great info! i cant wait to start trying these "steady" tricks! please keep the tips coming!
ReplyDeleteHey, I love this series. I totally agree that a good picture makes all the difference, and I always love your photos. Maybe mine will start improving. I will try with the cheapy point and shoot :)
ReplyDeleteThis is awesome! I will have to try the "L" -- what a great idea.
ReplyDeleteThese are great tips, I have a point and shoot Panasonic and a Nikon D-90 both of these i need help with. I like how you begin with the basis!
ReplyDeleteOooh! I just found this from MMS. I'm so excited because I always get frustrated taking pictures with my point and shoot! Your tips are fantastic!
ReplyDeleteThis comment has been removed by the author.
ReplyDeleteThank you SO MUCH for putting out great tips! I've put you in my sidebar because I want all my friends and family to benefit from your wisdom :)
ReplyDeleteOnce again, thank you! I'm playing a little catch up because I wasn't blogging when this series started. But I have learned so much from the posts I have read so far. I'm going to check them all out.
ReplyDeleteMy Dad was a well known professional photographer in our state and my kids think it is so funny how I just can't make good pictures. Ha! I am going to show them one day!