I have a challenging fireplace.

While I love my fireplace rock, it's dark and tricky to work with. Add in the fact that the scale of the fireplace is large, makes working with it even more of a challenge. Most everything disappears into thin air if the accessories aren't equally hefty.
I did however desire something new for the fireplace mantel this year to help brighten things up, so when I came across Pretty Handy Girl's barn door she made, I was immediately inspired! Thanks Brittany!
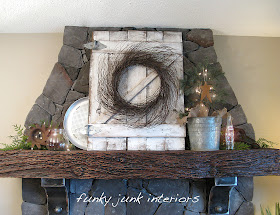
And here is my version!

I found the wood and hinges at that great junkin' bonanza next door I told you about HERE. Free stock! Doesn't get any better than that. :)
~ Decorating tips for a dark fireplace ~
Mini lights are your best friend. They glow like candlelight yet are much safer than flames. I set them in place first,
then decorate around them. The greens are hiding the light strings but you can be sure, the lights were making a big difference! The curvy glass jar filled with pinecones catches the light to offer a nice contrast to the rust.
See that rusty star burst thing? I have a special post coming up about that! It was sent from Iris over at Treasuring The Journey. LOVE it Iris!
My chosen theme this year is 'vintage whatcha already got' so the Pepsi bottle makes an appearance to help catch some light. The lights behind the ripply glass have a pretty neat effect. Plus it can even serve to hold a candle if desired. :)
This galvanized bucket (thanks Vic!) is holding a live evergreen branch in water. The burlap was simply cut and placed to appear like a rootball was present.
And there you have yourself a merry little junkin' Christmas! For free. :)
Would you like to make an old gate too? It's so easy!
~ How I did it ~
Would you like to make an old gate too? It's so easy!
~ How I did it ~
Tools I used:
- palm sander
- cordless drill with screw fittings and small drill bit
- circular miter saw
Supplies:
- 2 hinges
- a pull handle (not shown)
- screws gone wild in a magnetic bowl :)
1. Decide on the size.
I started with these precut cedar boards I had. They were the perfect height, so I simply decided on a width.
A little trial with something in front and I deemed it 5 boards wide.
2. Dry fit the boards.
Lay out your design so you know where you need to make your cuts.
3. Mark your cut areas with a pencil.
4. Make your cuts with a circular miter saw.
While any saw will do, I highly recommend one of these! Don't own one? Ask Santa. I couldn't live without mine. If you upgraded to one that pulls towards you to engage in longer cuts, I'll trade ya... :)
5. Dry fit once again with your cut pieces.
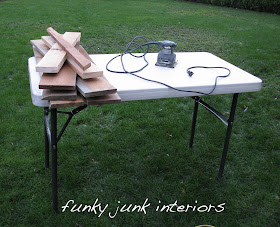
6. Lightly sand the boards.
I desired texture on these boards for a distressed look, so I went over them with the palm sander very lightly just to take the 'slivers' out. If you go overboard on this one, you'll end up with brand new boards, so just decide what look you're after prior to sanding.
I also like sanding outdoors and find this collapsible table totally invaluable for lickety split setups.
7. Decide on the screws and drill you will use.
While you can use nails, my personal preference is screws. If you mess up, it's easier to fix. :) Plus with this method, your mounting will be hidden.
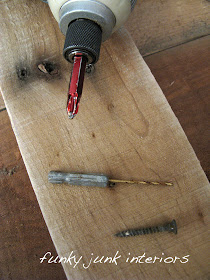
Ensure your screws are more shallow than your overlapping boards by simply holding them to the side to check. (see diagram below)
Predrilling holes is a good idea so your boards don't split on you. Choose a drill with a diameter slightly under the screw thickness. I used one alot smaller because the right one was 'missing.' :)
8. To attach your boards, simply slide the works towards you over the edge of the table and get your son to work below. :) (predrill all, then screw all)
If there's an easier way dear real woodworking friends, please speak! I always move the boards if I try to flip them over so this was just easier for me.
9. Paint if desired.
While the gate was pretty cute left in it's natural state, I required something abit lighter for my space, so I went with white.
I LOVE working with ceiling paint! It's got a finish that is amazing, and I never bother to prime. This stuff has body. Pretty amazing stuff.
I chose to paint just down the middle of the boards so I didn't have to sand away as much for a distressed finish. I wanted lots of wood exposed.
10. Sand your finish as desired.
Ceiling paint dries quickly, so you have to work fast. If you let it cure for too long, the finish is tough as nails and you just have to work harder. :)
The gate turned out exactly the way I envisioned it,
white twig chandelier
blogging office
old gate screens
and it looks great with all the distressed whites upstairs. Love it!
white twig chandelier
blogging office
old gate screens
and it looks great with all the distressed whites upstairs. Love it!
I'll be tweaking the mantel after I put up my tree. I really prefer to work on them together and my tree is still buried deeeep under the stairs. (I may hold out for a real one this year!)
So stay tuned for the permanent update. Coming soon!
Now to make some free junkin' tree ornaments... hmmm..
How do you deal with a dark fireplace?
I'll take any tips I can get!
Kim over at Us in Otto was inspired and made her own!
How do you deal with a dark fireplace?
I'll take any tips I can get!
Kim over at Us in Otto was inspired and made her own!


Looks wonderful....love it!
ReplyDeleteOh my goodness Donna, your mantel looks so amazing!!!! I love it!! The white washed barn door looks so great and it really does lighten up the look of the fireplace. I'm glad you left the twig wreath because that says "Donna" to me. :)
ReplyDeleteHugs,
Lisa
Love this! I am mantel jealous. (I don't have one here. bummer.) But I do have a really looooong, low tv cabinet. I wonder....
ReplyDeleteLove it!!!!
ReplyDeleteHi Donna-
ReplyDeleteLooks perfectly perfect against the stone fireplace. I love the proportions.
I am thinking you are going to be making some pretty clever ornaments from your recent junking haul. Can't wait to see what you come up with.
My best- Diane
So funny, before I read on and just saw the red barn door, my first thought was "wow, FJ Donna is getting bold with color!"
ReplyDeleteLove the gate and the entire setting.
The gate turned out so good. Looks great up against the stone and really brightens everything up too. I usually use fresh greens but it's a bit too early here for that. You beat me to the bucket and branch idea!
ReplyDeleteAAAAAAWESOME, DONNA!!!!! I JUST LOVE IT LOVE IT LOVE IT!!!! You did such a terrific job with your mantelscaping!!!! After I read how you did it, I glanced up at my own mantel (much smaller and all white), and thought "Hmmmmm.....I wonder how that would look on my mantel instead of that huge framed mirror....?" Definitely on my "gonna check that out soon list". Thank you for the great tutorial, too. You just ROCK, girl!! lol!
ReplyDeletexoxo laurie
The old barn gate looks like it's really "old". That always means you nailed it! The whole mantel set up is just awesome. Looks great with all the other white distressed goodies. Can't wait to see more...
ReplyDeleteI'm posting soon on my new mantel we've been working on.
Blessings,
Becky C
Donna, it looks great! I love your junk and how you proudly spread it all over your fireplace mantle. You rock. Brittany's mantle looks great, doesn't it? What's funny is that I was planning to lean a part of a red barn door on my mantle as well.
ReplyDeleteI got rid of all my primitive looking things a long time ago.......dang........I'm wishing I didn't... You're making me want this look again! :-)
ReplyDeleteWarm blessings,
Spencer
It's perfect! It is so bright and cheery and fits right in at your place. Love it! I love that you used those hinges so quickly. I would have nabbed them up and kept them in storage for a few years until I figured out where to use them. Good job! Lisa~
ReplyDeleteit may be dark and hard to work with but it is amazing... I have always envied it! and with the barn door... I LOVE it even more! :)
ReplyDeleteI love your door, Donna! The white looks perfect against the dark stone, and that round glass jar is just so neat!
ReplyDeleteWOW! That is just amazing the vision you had to do this! It is pure perfection. I'll have to remember that ceiling paint idea!
ReplyDeleteIt looks amazing as always Donna. The gate is the perfect backdrop for everything. Thanks for showing how you made it, now I need to find somewhere in my house to put one. Oh, and then make it, but probably after Christmas. You always motivate me to try new things.
ReplyDeleteThat looks great Donna! You are so handy :)
ReplyDeleteI really like the distressed white paint job. I don't have a beautiful stone fireplace to build a gate but it did inspire me in another way. I have been thinking of building a dressing partition in my sewing room. I think this would look amazing and with your instructions I should be able to modify it to my own dimensions.
ReplyDeleteThat turned out freaken fantabulous!! Keep the ideas coming for a dark fireplace. Mine is 99% done and is stack stone and old upright piano wood...VERY dark walnut. I love it but everything I've tried to put up there (except the deer skulls & antlers)just melts into the dark wood. I'm thinking white fluffy snowflakes for Christmas and maybe throw a lamp for "ambience. Gotta go check out the mantel party....
ReplyDeleteI have no words.
ReplyDelete*heart*
The HINGES! That's what you did with them!
ReplyDeleteI love it too!!! Now you are really making me mourn the loss of my mantle! My beloved plunked a big honkin' TV just above my gorgeous fireplace and now I have all of a three inch space to decorate and the only thing it sports these days is a small speaker to the sound system that accompanies the big honkin' TV. I am of to sulk!
ReplyDeleteLove the barn door! And the simple rustic charm of the whole mantle! It totally has your name written all over it. Another job well done!
ReplyDeleteNow if that were me, I'd put a mirror in it...
ReplyDeletebarn board mirror
...but seriously, it's great and very you!
What an awesome mantle you have! I love your door, and the wreath totally makes it!I so admire you for using a saw, I am scared to death of them~
ReplyDeletesaid door meant gate!oops
ReplyDeleteLove your gate!!! And the great thing is you can probably re-use it for other seasons. Nice job and thanks for the shout out.
ReplyDeleteOh yes, and when you are done with that rusty star thingy, send it my way! LOVE IT!
Brittany
http://www.prettyhandygirl.com
I love the gate/barn door too! Especially love the wreath and how it looks on the white. The whole mantel is fabulous.
ReplyDeleteThanks for the painting technique tip -
Marsha
Very cool Donna! Love what you've done so far. Looking forward to the tree!
ReplyDeletePerfect! It came out beyond wonderful, I love this. xo Lidy
ReplyDeleteYou're just too cool for school! Your mantel looks fantastic, Donna.
ReplyDeleteHappy decorating!
: )
Julie M.
This is wonderful. Your gate is perfect for your mantel. The mantel looks fabulous and only you would think to sit a Pepsi bottle up there for catching light. :) It looks darling.
ReplyDeleteI am on a hunt for a cute wooden drink crate..can't find one anywhere. Will keep looking, tho.
You are incredible. I had to show this to hubs cuz I thought I had this saw..and yes we do have one just like yours! Now only to learn how to do the miters, I do the straight cuts on my curtain rods. YOur mantle looks all rustic and woodsy! I would consider adding some green clippings into the twig wreath though, because I love how the greens soften the harder elements.
ReplyDeleteYour mantel is fabulous! The barn gate is genius! I love the large mantel and fireplace...because working large scale turns me on for sure. Lucky you!!
ReplyDeleteThe added hinges are a perfect touch.
Love it all!!
Hugs
SueAnn
You never cease to amaze me with the wonderful projects you come up with. I love what you have done with your mantle and 'free' stuff.
ReplyDeleteHave a wonderful Christmas season. You are getting me in the mood to decorate.
FlowerLady
OMG I cannot fathom making a gate that looks like this! This is sheer genius, Donna. It looks wonderful and adding in all your free accoutrements just made it POP! Love the old Pepsi bottle and the pail w/the pine bough. So fun. Thanks for visiting last night. ~ Sue
ReplyDeleteOh, wanted to say that I saw chandeliers at the furniture market last month very similar to your twig one. They were big bucks! Love yours....
Love your Christmas mantel all sparkly and junky. How great was it that that junk appeared next door so you could make it. I love the little white gate. Can't wait to see your tree covered with junk - sparkly junk.
ReplyDeleteOMaga.....beautiful junkin' mantle!!! I can't believe I can see so many different types of mantel decor and love every single one of them.
ReplyDeleteI think I want to add those wee lights to my glitter, but hubs would go psycho on me after helping me set up yesterday :)
And hey! I actually used a table saw when we trimmed out the fireplace...you'd be darn proud of me.
I love it!!
ReplyDeleteI love the gate that you made. You wasted no time utilizing some of your great finds from the weekend.
ReplyDeleteYour mantel display is perfect. I still have to get pictures of my finished mantel before I can post but I used stuff I had around the house too....my husband's childhood sled, an over 100 year old window from the house I grew up in, an old Tonka truck of my husband's from the mid 60's. It was a lot of fun "shopping" in my house for the perfect stuff.
Jane
Luv it! What a difference it made on that fireplace. I luv mantles but I don't currently have one. Will have to find something. Great job!
ReplyDeleteYou got skillz!
ReplyDeleteLove love love it! I saw the barn door on Brittany's site and thought about you and then you did it! HA! Your mantel is beautiful and I just love all the great funky junk things on it!!
ReplyDeleteOh yes!!! This is gorgeous...I love anything with gates and fences and this is perfect!!!
ReplyDeleteSeasons Greetings!!!
Deborah xoxo
Sheer genius!!!! I love the way this turned out!
ReplyDeleteamazing... looks so pretty. you see it, you make it--so talented! I am thinking you could probably sell a lot of these... plus how fun to decorate it for each season! It really does lighten up your fireplace. I think you are dealing with it perfectly--the white touches, little lights and metal all make it shine!
ReplyDeleteAbsolutely lovely. Love the twinkling mini lights in there. The only way it could be prettier is with a Coke bottle instead of the Pepsi one. he he Thanks for the junkamazing inspiration, as always! :)
ReplyDeleteYou know, one probably wouldn't be able to guess the gate was not ready-made. It looks wonderful! If you were to make more and sell them, I'd be first in line to buy! Wish I had a mantel to decorate like that, although I read about using a decorative shelf as one at The Inspired Room. Don't have a circular miter saw though.. much less any saw. Haha. I need to go make friends with someone here who has one... ;)
ReplyDeleteSo love the idea with the tree and the bucket! This would be perfect to leave up all year! Head on over to our blog for our 12 days of giveaways starting tomorrow. It will be fun!
ReplyDeleteLinda & Dixie
funkyjunksisters.com
This is fabulous!
ReplyDeleteI love that door! Thanks for showing how to make it. Perfect!!
ReplyDeleteCheers!
Donna, that is so gorgeous and it looks so great on your mantel. Another fabulous project!
ReplyDeleteI love the gate, Donna! You distressed it just perfectly... as always!! Your mantel looks gorgeous... all of the accessories are the perfect added touch! I love the lights! I'm thinking of adding some to my mantel this year, too, but just not sure since my tree will be nearby... may be too much.
ReplyDeleteThanks for continuing to inspire my friend!
~ Jo :)
It's GORGEOUS! I love it!
ReplyDeleteWell we can count on you for some truly original inspiration and a handmade-especially-for-this-job-centerpiece. You work fast lady!
ReplyDeleteLove it and I love that we both used a twiggy wreath, makes me feel like your mantel sister.
Love all the elements individually, and of course you rocked the vignette. Very very cool. Your fireplace has such great character.
ReplyDeleteI love your blog and your great ideas so hope you can help me with my problem. I have a corner fireplace (walls and floor are bricked with wood stove) and I have been wanting some kind of mantel/shelf above it for years now but don't know where to start. Any ideas?
ReplyDeleteThanks, Sandy
s.eickhoff@sbcglobal.net
Gorgeous .... as always
ReplyDeleteYour mantel is stunning, I love the rustic feel, and your instructions are perfect!
ReplyDeleteLove it. You are so good with your power tools. You turn out such great pieces.
ReplyDeleteLooks awesome! I would leave that up in my house all year round!
ReplyDeleteI LOVE your funky junk mantle! It's so original and fabulous!
ReplyDeleteThat mantel decor is perfect for your house. Thanks for the tutorial on the gate, I've been thinking of making one for my family room.
ReplyDelete#58, I'd love to see a picture. You have no profile enabled with an email so if you see this, please send a pic or a direct url online so I can see your area. Thanks!
ReplyDeletesignmakergirl@hotmail.com
Wow all, thanks so much for the kudos! They all feel like hugs. :)
Donna
Oh, good heavens, Donna. I mean, you've outdone even YOU! This is just wonderful--the gate looks awesome with all that rock, and your entire mantelscape is so cozy and festive! Way to go!!
ReplyDeleteYou have THE GIFT for decorating with junk! In your hands trash truly does become treasure. Love the gate!
ReplyDeleteI see what you mean, that would be a hard mantle to work with BUT you did it so stinkin' cool!!! I am loving everything. Especially the pizza pan, I have one just like it and I have always admired it's simplistic beauty but never . . . not anymore, that baby's coming out of the cupboard.
ReplyDeleteLove it! But I knew I would. I love the gate, heck, I love everything you do.
Really makes me want to re-think mine, thanks for all the great inspiration.
Merry Christmas.
Looks great Donna, like it was old and not just newly made. It's funny, I have had my old barn door on my mantel for a couple of months and just took it down to change it up a little, but it will be back!
ReplyDeleteSo I thought I commented on this post when I saw it last night. Or was that this morning? :) Guess I'm losing it. Anyway I LOVE the gate. Perfection. Your mantel is yummy too. I thought of you last night when I suddenly decided that my fireplace needed an "old" wooden gate to act as a screen - guess that will be my next project. Maybe I should finish the other 16 I have started.... :)
ReplyDeleteBeautiful!!! Can junk BE beautiful? Well, I sure think it can be in your hands!
ReplyDeleteInspiring as ALWAYS!
WOW......seriously WOW! Woman. You. Are. Amazing!
ReplyDeleteI linked back to you today in my mantel post!! :)
http://alililly.blogspot.com/2010/11/new-christmas-mantel.html
There is nothing a woman with power tools cannot do! This looks wonderful! I love how you take things I would never think of and make them look like they totally belong. Kudos!
ReplyDeleteThat gate made a huge difference love it!
ReplyDeleteLOVE the barn door and natural elements! Looks GREAT!!! I wish I had an ounce of your handiness when it comes to tools!
ReplyDeleteLove it! And you know, my mother always takes anything free that she can get her hands on, and has made the most gorgeous country home. Good for you! :)
ReplyDeleteso funny as I recently just redid my mantel too & it looks strikingly similar. Of course - I didn't have your made gate makin skills at my disposal - unless ya wanna come on over!! I'll show it off one of these days if I can get some good pictures! :) LOVE LOVE LOVE that gate!
ReplyDeleteI could, I could make one of these. Drat, I don't need one. Your gate is perfect on the mantel. Thanks for the heads-up on the ceiling paint.
ReplyDeleteLove the rustic gate! You "brought" the outside in for the holidays! So you!
ReplyDeleteDonna, The gate and your mantel are Fabulous!! It looks perfect against the stone fireplace and it so has your style written all over it. I hope to see you at my party.
ReplyDeleteHappy Holidays,
Sherry
The mantel looks great, Donna! And you used one of my starbust rusty things that I sent you! YEA! Thanks for mentioning my blog, I appreciate it! ~Iris~
ReplyDeleteThanks for the mini tutorial. I made my own gate today and I'm SO proud. lol My first time to do something on this scale, I think. I'll be posting about it in the next day or two. Thanks for the inspiration!
ReplyDeleteElisabeth @ Treasuring the Moments
Mini lights are your best friend. They glow like candlelight yet are much safer than flames. I set them in place first,
ReplyDeleteYour mantel turned out wonderful! The new/old gate made such a lovely starting piece to build on. You have such a great eye for placing things. I posted about my Christmas mantel and borrowed a couple ideas from your last years mantel. Thanks for inspiring me.
ReplyDeleteSo well done on so many levels. Your simple gate has shifted the emphasis and the eye goes right where you want it. Clever. Love that metal thing peeking out behind the left side of gate. Yes, the rust with the shiny white lights is ideal. You even sneak a bit of silver in there with the galvanized pail.
ReplyDeleteWell done! Would love to see you add one more item in a red tone. Small. In front of white gate and inside the other items.
Just a very pretty and well designed area. Dark no more.
i like
ReplyDeleteI just love how you mix things up!!!
ReplyDeleteI am making one of these right now for my blog! :) You'll have to stop over and see it -- www.jhousetawk.blogspot.com
ReplyDelete