Funky Junk Interiors and Mustard Seed Creations!
Miss Mustard Seed will be bringing you a new edition when her post is ready to roll. It's a busy time of year for both of us so I hope you understand the need for abit of leeway. These workshop posts take considerable time to build, so we really appreciate your patience! :)
Good news! This week on Funky Junk, we're continuing with Part 3 of
~ Blog Photography 101 ~
Great shots from a point and shoot
Disclaimer: I am not a pro photographer. I've never even taken a course. The info I'm providing you is simply from my own personal experience, as well as tips from friends and online resources. If you can add/suggest additional related info, I very much welcome your input in the comments. Thank-you!
Today:
3. Using photo enhancing software.
To come:
4. Shooting with good backgrounds and interesting angles.
5. Getting to know the settings on your camera.
~ Part 3 - Photo Enhancing ~
This is the kind of photo you'd find pretty typical on my blog. A nice artful type crop, perfect for a blogroll thumbnail. But it didn't start this way.
This is how it came straight out of the camera.
While the picture had potential, it was too dark, and wasn't cropped tight enough to tell the story as well. Fiddling with the picture in a photo enhancing program for a few seconds took a normal schnormal photo and turned it into something completely different.
Here's an outdoor shot where lighting shouldn't be an issue, right? Does this overcast of darkness look familiar?
With a little bit of lightening, you get a totally different feel.
Photo Enhancing Programs
The improvements are due to a photo enhancing program. There are many out there, however my chosen weapon is Picasa. It's a free photo enhancing photo software you can download and use within minutes! And I wouldn't post even one single photo without using it.
There are other free programs out there that do the same, if not better than Picasa. However, since I'm personally proficient in this program, this is the one I'll guide you through today, to simply show you, even a little free easy to use program can get you some great results for your digital pictures.

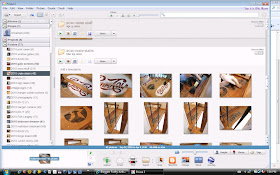
Here's a screen shot of what the inside of Picasa looks like when you have pictures loaded. I download my pics right from my digital camera into Picasa and sort them by a title and/or date. This makes finding a subject an absolute breeze!
My favorite settings
Indoor shots always need some work and this one is no exception. Does it look ok to you as is? Watch what the smallest tweaks will do!
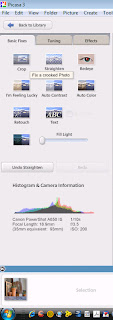
When your picture is in Picasa, this is how the window will appear. Your pic will be to the right, with your options to the left. Very nice sized working windows.
The left sidebar is where all the magic happens. BASIC FIXES, TUNING, EFFECTS are where all the options are to enhance your photos. Let's start!
1. Lighten it up
ALL indoor pics, and I mean ALL, need lightening up. And if you're being good and following previous instructions, you are NOT using your flash and you ARE using a tripod for the best possible start, yes? Good! :)
1. Choose your picture and it'll appear in the big window as above.
2. Select Tuning.
3. Slide the FILL LIGHT to the right.
4. Slide the HIGHLIGHTS to the right.
Fiddle and stop when it looks good.
This is the result. Amazing, isn't it?
Tip: A good starting photo will lesson the fixing steps. Not using a tripod nor extra lighting? (tsk tsk!!) Add straighten, saturation, and sharpen. Just play around until things look good.
2. Straighten & watermarks.

This is an option I use ALOT. While some shots look great on an angle, I believe you have to exaggerate that angle (but know where to stop!) to make the effect look intentional. The photo above just looks sloppy imo. Bear in mind, I see crooked where most don't, it's just the way my insight works, so I'm alot fussier than most. Crooked photos drive me insane! xo


See the difference? And note I added a watermark in the picture? The ABC button in your selection area allows you to do this so easily!
Effects used:
Basic Fixes - straighten
Tuning - fill light, highlight
Effects - sharpen
3. Special Effects
I guarantee, if you're new to this program, you'll want to use this. Alot. But heed my warning. Too much is too much. Some hazy pictures have me feeling dizzy and done too much, your subject can flat out look out of focus, not what you're trying to achieve. What I've done below is borderline but I wanted to show you a few options.
Effects used:
Tuning - fill light, highlights
Effects - sharpen, soft focus, focal B&W
Basic Fixes - crop
Wahhhh!! Get me off this fuzzy mountain top! I'm falling over!
Have SOME fun, but know when to stop. :)
4. Saturation
I use this one for all those photos that either need abit more colour or I want to remove that ugly yellowy cast from an indoor shot.
Effects used:
Basic Fixes - crop
Tuning - fill light, highlights, shadow
Effects - sharpen, saturation
And just for fun, I want to show you the difference when taking a photo indoors vs outdoors.
Effects used
Tuning - fill light, highlights
The colours are soft, natural, lightness intact, and no yellow cast. This just goes to show, create an outdoor photo shoot area under cover in diffused lighting and your photos will improve drastically.
This was simply an intro into what a software enhancing program can do for your pictures. Good pictures are all smoke and mirrors, folks! So download your freebie program of choice today and start playing!
Other programs to try that I haven't yet : Photoshop, Picnik
Assignment for this session
1. Use good lighting and a tripod when taking all pictures for the best possible start.
2. Download a photo enhancing software and start playing.
3. Experiment with ALL the options so you get to know the features.
4. Special effects - know when to stop!
Just an optional thought...
5. Brag about it! - Create a post about your new amazing photos. And let the masses know where you got your amazing ability techniques from. :) xo Come on back and in comments, throw in your url so we can all take a peek!
Me - "So Miss Mustard Seed, your photos are amazing! Do you use any photo enhancing sofware to help you along?"
MMS - "“I absolutely love digital photography and how adaptable it is. As you have shown, any picture can be cropped, colored, adjusted and tinkered with to make it great. I use Adobe Photoshop Album to catalog my pictures and for basic adjustments. Some of my pictures just need to be cropped and have the contrast adjusted and this program will do the trick. When a photo needs some major lighting or color adjustments I’ll use Adobe Photoshop Elements. I’ll also use this program to convert to black and white or add effects.
My favorite adjustments are the fill flash, contrast, brightness, and saturation. I’m not a huge fan of effects. I think they have their place, but I don’t want to look at a bunch of foggy pictures, you know? No offense, Donna. Your foggy picture looks great and I appreciate that you use it sparingly! :)
A great tip is to make duplicates of a photo you love and crop it in different ways to showcase different subjects in the picture. You can get three or more great pictures out of just one shot. Pictures can also have a lot more impact when they are cropped properly. Also, try removing all of the saturation from a picture and bump up the contrast for a great black and white shot. ”
How did you do with lighting? If anyone has noticed any remarkable differences, please feel free to post the url if you have an ongoing post up.
Have you got a fav program you use? We'd love to hear which it is and why you use it! Any questions? Shoot! That's why we're here. :)
Have you got a fav program you use? We'd love to hear which it is and why you use it! Any questions? Shoot! That's why we're here. :)


That was such wonderful information! The lesson was fantastic, thank you so much!
ReplyDeleteHave a great day!
Nancy
I'm publishing a link to your blog on my blog tonight (late tonight!). Thanks for these camera lessons. I've gotten a lot out of them so far. I also use Picasa software and have been very pleased with how easy it is to use. One of my favorite things to do with photos is to make my own postcards - I love to connect with people the old fashioned way and they love to get personal postcards that are photos I've taken. I do the whole 9-yards with printing or writing a description of the photo on the back of the postcard, the date it was taken, and give credit to the photographer whether it was me or someone else. And if I use someone else's photo I ask permission! I made postcards for Christmas cards, too.
ReplyDeleteI didn't know you could edit with Picasa. Thanks for sharing!
ReplyDeleteGreat info!! And wonderful tutorial. So easy to follow! Thanks so much!
ReplyDeleteHugs
SueAnn
I haven't tried Picasa, but I do use picnik.com all the time. I'll have to give Picasa a look. Thanks for all the tips.
ReplyDeleteFab tutorial! Thanks so much.
ReplyDeleteI soooo needed this. Thank you so much for going to the trouble to do this. I know it takes a long time to make posts like this. Bless you! I've learned a LOT!
ReplyDeleteI use Picasa & I love it!!! It is pretty easy to use. I'm loving this series about photography. I use a Sony Cybershot point & shoot camera. I only use the automatic setting on my camera. I need to really read my manual. And I still need to get me a tripod. But Picasa does make my photos better. And my son gave me his Canon Rebel SLR camera. I'm just afraid of it right now. I need to learn to use it.
ReplyDeleteThanks for the tutorial...very informative! I use my kodak photoshop to do my pics, but the picasa looks fun too. :) (I have also used photobucket, which has a lot of cool gadgets as well)
ReplyDeleteKeep up the great work, I'm enjoying your tutorials. :)
MELISSA
Thank you; I really need help on my food blog. I think I'm getting better but I will start from the beginning of the series to learn what I can do to improve.
ReplyDeleteDomesticProductions15.com
I linked this to our friday's favorites... everyone needs to check it out.
ReplyDeleteI have used picasa for years and still learned something new!
Thanks bunches.
Thanks so much for this post! I used to use Picasa and forgot about it when my computer crashed. It makes such a huge difference! I've spent hours on there since reading this post. I forgot that you can use text and write your name on all your pics. Even those of us with a fancy shcmancy camera can benefit from using Picasa.
ReplyDeleteOoo, I wanted to add for anyone reading this that if you are putting your name on your pics, test one out on your blog before doing them all (if you are going back and putting your name on all of your pics) because it looks MUCH smaller once you have it on your blog vs. in Picasa. Also, one way to judge which way to go with the color temperature is by the whites or neutrals in your pics.
ReplyDeleteI love Picasa, but probably use the soft focus more often than you would like :). I just read your lighting post and can't wait to try the diffusing.
ReplyDeleteWondering about Picasa. Does it hold your pictures in their folder,plus you have them stored in your own folder on your computor....taking up double space?
ReplyDeleteLooking forward to the next installment
ReplyDeleteI am really enjoying this series-hope to see more! What a cool blog.
ReplyDeleteSo helpful, thank you so much for sharing! I am new to blogging and this has been great.
ReplyDeleteI found your link on Miss Mustard Seeds blog and I have read through every post in your workshop. Since getting a nice camera and investing in software is not an option for me right now, this was WAY helpful. I'm in the process of opening an etsy store and I know the secret to having better sales is great photos. Thanks for the workshop, I really appreciate it!!
ReplyDeleteDonna,
ReplyDeleteI just found this series via Miss Mustard Seed and I'm loving it! I'm such a photography noob (and a blogging noob, if you want to get technical) but after reading these three installments, I'm inspired to really learn how to use my point-and-shoot. I've also already putzed around with Picasa in my latest blog post and gave you a shout-out, too. ;) I kept thinking I needed to just get a DSLR to achieve good quality photos, but I can't afford it, and honestly I'd much rather use what I already have. Anyway, I'm babbling now, but THANK YOU. You rock!
Erin
Found you through Mustard Seed. Love the info that you provided. I have been dying to get a new camera and it has not been in the budget, and I have been struggling with ways to make my pictures better with my "point and shoot". Seeing your pictures let me know there is hope for me!
ReplyDeleteHey Donna- this workshop is terrific with do-able things to improve my photog skills. Thank you.
ReplyDeleteDid you ever finish this with the last two installments? I can't seem to find them (and am I missing the search button- can't find that either!) and I'd love to find more of your great tips!
Jami
An Oregon Cottage
I just found this and am SO thankful! I have been uploading to Picasa lately but haven't taken the time to sit down and learn how to use it. Now, I'm inspired to do it soon! Thanks so much!
ReplyDelete