
At long last, my closet dilemmas are OVER!

This was my bedroom closet for about 3 years. After painting it, I never replaced the closet innards because I didn't have a place for these linens.

You see, the linens needed to go here, and I didn't have anything for that yet.

I decided to finally build a linen closet...
(how-to HERE)

... which left no place for my clothes. So my version of a walk through hallway closet came into effect. After hitting my head umpteen times on the clothing, I got fed up and head to Walmart.
You see, I had anticipated making something really cool and outlandish even, however at this point I didn't desire more delays.

So I went retail and picked up a $50 kit. I mean.. it's a closet. It's behind closed doors. I'll save cool for where I can see it this round. :)
Now, what I DO love about kits is that they're fool proof. Holes are predrilled, hardware is intact. Just add your tools and prepare to spend 1 hour of your life reading directions and building it and call it done. Works for me!

Tools required
- cordless drill and bits/drills
- measuring tape
- pencil
- level
I really love tool kits that travel. This Makita drill kit has both drills and bits so everything is easily mobile and intact. But it doesn't last forever... I'm well overdue for an upgrade as most of my bits are stripped. It's on the list!
Assembling the shelving

I chose a closet style that had shelves in the middle of all the hanging apparatus. Deadly simple to install with your cordless drill!

This kit had two shelves stacked on top of each other. They're held in place with a peg in hole trick which worked like a charm.
Hardware and rods

When attaching the rods to different surfaces, you need:
- Wall mount side - left - thicker drill, long screws, anchors
- Shelf mount side - right - thinner drill, short screws

The rods were adjustable white enamel, oh so pretty and smooth! The little hole is designed to clip onto the lower hinge tooth.

Installing the shelf brackets - first
- decide where to place the bracket
- pencil inside the holes for reference
- predrill wood
- screw bracket on
Installing the wall brackets - 2nd
- measure height off floor vs how far away from the wall shelf bracket is
- pencil location on wall
- predrill drywall
- mount anchors by pounding them in with a hammer/rubber mallot
- screw bracket on
Check the level of both rods and shelving before making their placement permanent.
There were also brackets to attach the shelving unit to the wall. (no pics)
Reveal
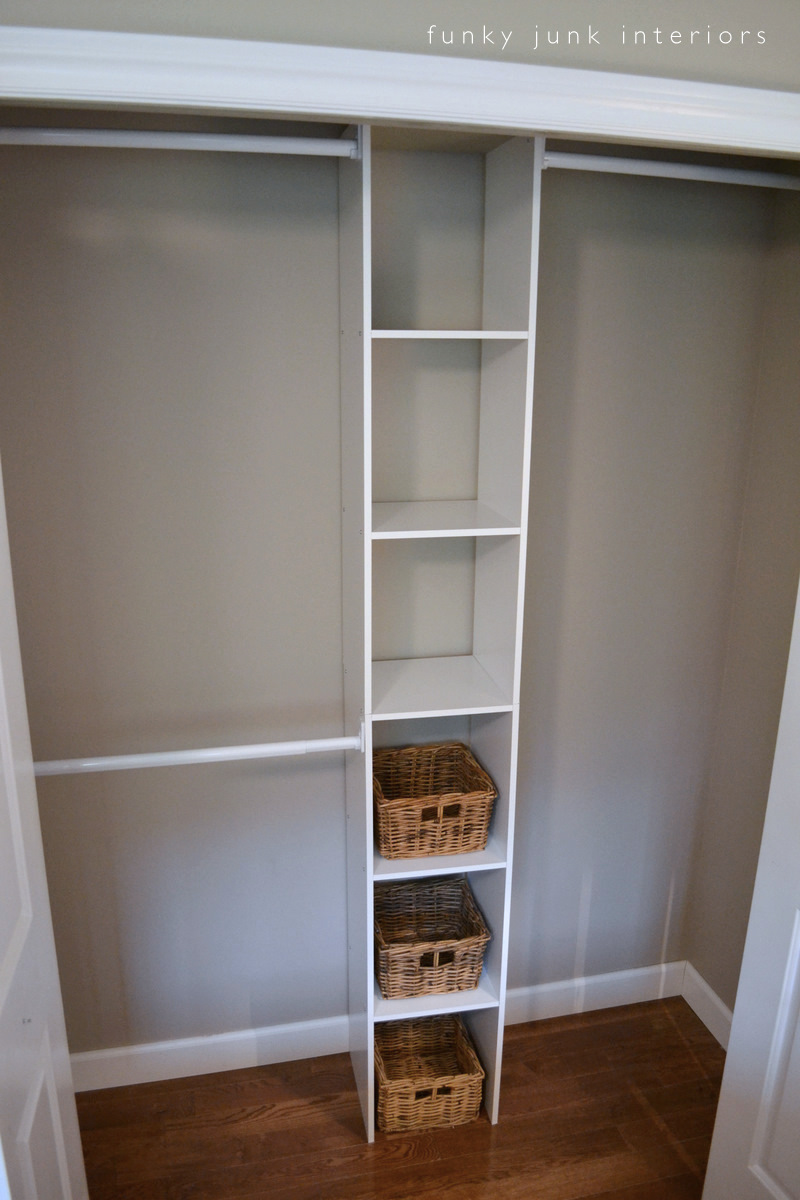
Tadaaaa! Isn't it pretty?!?

These Ikea baskets I've had for a bazillion years fit perfectly in the shelf. Great for socks, etc.

And then it was time to move in! YES.


With room to spare! And yeah, I even color coded my shirts. :)
I also made myself a deal. I could slowly upgrade my wardrobe as I could afford it AFTER my closet was put in. No more excuses!!
I can also see this system working awesome for the entry way closet. Nice shoe and mitt storage!

I love my new closet! This system suits my simplistic needs and fits perfectly for this space. Additional and wider shelving appear to also be available as per the website, however I didn't see those options in Walmart.

Did you join the Parade of Homes link party?
Andy also revealed her own colourful home! Don't miss it!

Last summer we put the Closetmaid Kits in both of our boys rooms and we love them. Now we just have to be patient and do our walk in closet. It is going to take more pieces, so we will probably need to wait another year or so. It is so worth it to go this way though. The custom closets are so similar for ridiculous amounts of money.
ReplyDeleteWhat an awesome transformation. Ive always wanted one of those organizers. The house Im in now had a wire system already in it (yuck). I have to say I love that you have wire hangers....so Joan Crawford of you! Fabulous reveal!
ReplyDeleteMJ
Lucky 7 Design
WHAT a transformation and great tutorial!
ReplyDeleteI have a closet that looks a LOT like your before photo but filed to the brim...might need to get out my drill gun this week...and make a couple drop offs to the Goodwill! Bring on the spring cleaning!
I love these systems. They're the perfect answer for an inexpensive solution. Your closet turned out great.
ReplyDeleteLooks great! I'm sure it feels even better having it completed, finally. :)
ReplyDeleteLooks fabulous!! I didn't realize those kits were so easy. I was sure they were a pain!!
ReplyDeleteI will have to check them out for sure!!
Hugs
SueAnn
Wow it looks fantastic!! Great job:)
ReplyDeleteIt looks great Donna. It looks a lot more expensive than a $50 walmart kit. I have spent $100s on closet systems from Lowes that I did myself. This looks like a winner. Love the baskets.
ReplyDeleteYour closet looks spectacular!
ReplyDeleteAren't those kits the greatest! We have put in 13 closets in 4 houses so far... Yep you read that correctly. The larger kits are wonderful as well and can usually be found at Lowe's, Home Depot, and sometimes even Target. In all honesty we will probably be installing sets number 14 and 15 once the addition is built in order to help keep costs to a minimum.
Well that didn't look too hard and now you have a great organized closet. I thought it was funny though that those little wall brackets look like little faces with one little tooth in their mouths (I'm a little nutty that way).
ReplyDeleteI enjoyed the Poppies at Play Tour of Homes. I did link up but didn't link my house. I linked posts about my cousin's authentic little cottage. I linked them up to SNS too. If you get a chance, check out the backyard of her cottage. I think it's right up your alley.
Enjoy your week!
OK, this is just what I needed to see! It looks great and mine looks like crap, so it's on my to do list! Thanks for the inspiration!
ReplyDeletegreat work Donna. Those kits are great. I need to put them in my daughters room as they just have those wire racks and only one shelf.
ReplyDeleteHahaha!!! I am just loving
ReplyDeleteyour walk through closet :)
Actually how way cool is the
finished closet!! And you definitely
can't beat $50!!
xoxo
Lori
Looks great! Have fun "updating your wardrobe."
ReplyDeleteVery nice! Great update and looks fantastic! How about upgrading the hangers? You can get inexpensive white plastic ones at Walmart, and it will look great with your upgrade. Then you'll have all the leftover wire ones for funky junky projects!
ReplyDeleteThat is so neat! I'm now convinced anyone can do that and what a difference it makes. Thanks for sharing!
ReplyDeleteHa! I'm glad I'm not the only one that saw the brackets as a one-toothed smiling man! Nice job on the closet! I think I want to run out and do the same now! Thanks for the inspiration!
ReplyDeleteI am loving the idea for the hall closet.
ReplyDeleteI love your do it yourself ability and confidence. Great job.
'closet innards'!!! LOL!!!
ReplyDeleteNever will I think of the inside of a closet in any other way! I LOVE that!!!
Yours is sweet and thanks for the directions and the whereabouts to get the innards! I NEEDED this one!!!!!!
The baskets are great too!! And color coordinating the clothes??? Well, let's just say 'you're speaking my language'!!!
xo
~K
For $50 and an hour of your time, that rocks! We did the Container store Elfa shelving and it took longer and was much more expensive (even though I waited for their Annual Sale.)
ReplyDeleteNice job, Donna!
We have more closets to do (the builders back on '59 didn't screw the shelves and brackets supporting the hanger bar into studs. Nope. They nailed, yep smooth inch long nails, right into dry wall. Dorks - lol. (So they're all just barely hanging on...)
well donna about time ;). i cannot believe it took you sooooo long. must have been distracted by all of your other projects. our last house had a small walkin closet so i had a closet planner come in they wanted an outrageous amt of money so. i changed the plan to meet my needs and it was my christmas present that yr from my honey bear ;). one of the best ever.i personally love closet maid and have some of the wire baskets in our present closet great for socks and sweatshirts.
ReplyDeleteits so nice to actually see what you have. pretty and organized ;).
You've inspired me! I have been putting off this project for too long- next trip to the "big city" I'm picking up the components and getting started! Thanks for the "how to" and before and after pics- Congratulations- yours looks great!
ReplyDeleteVery nice! I bet you won't even miss having your clothes live in a heap on the floor :)
ReplyDeleteI'm just glad that I'm not the only one that actually color codes my shirts in my closet!
ReplyDeleteMichael
bluevelvetchair.blogspot.com
I knew I loved you! That is the same closet system that I put together for my kiddos...It is configured differently, but the same idea. It is the best. We have one tiny closet and two kids sharing a room. When we moved in it had one bar...what a waste of space!
ReplyDeleteThanks for all your clever and charming ideas you share!
Heidi
Yep, I have those closet systems in all our closets. But they were here when I bought the house, so I can't claim to have put them up. They are very handy though. I really do love that you have your clothes color coded. Might even get me inspired to clean up my closet.
ReplyDeleteThey make closet organizers?!! LOL
ReplyDeleteI share a standard builder's size closet with my hubby; read as: lots of folded clothes in dressers and on free-standing shelves. Plans are on the drawing board for a re-hab, but that is a ways down the road...
Our previous NEW home had a HUGE L-shaped walk-in closet with tons of room and outfitted for all kinds of sins.
Yours looks fabulous! Simple, neat, clean, organized...hmmmm, maybe I'm a bit envious? Maybe. Wink. ;-)
Donna-
ReplyDeleteSweet closet! I'm so jealous. For one that you have a closet...and two that it is now ORGANIZED. My little country bumpkin house had 2 closets in it when we moved here 15 yrs ago... and now were up to 4! (that's if you count the water heater closet!
Anyway-- great tutorial- RTA (ready to assemble) closets and furniture are quick and easy...I'd rather have RTA closet-as the furniture is cookie cutter-UGLY...sorry.
Now about the photos???
Cody taking pictures of Mom working? You've trained him well, if that is the case. Otherwise...you have your camera on a timer? and I must have missed that tutorial...
You're so busy!
have a great week.
Awesome, girl...your closet looks perfect!
ReplyDelete#29 Pat, Cody indeed took the photos. He likes to click and just sort of followed me around. :)
ReplyDeleteDonna
It's awesome :) and so clean, I just want to stare at it and enjoy.
ReplyDeleteNow somebody needs to have a closet parade and maybe that would motive me to get mine done.
Just a thought.
Donna,
ReplyDeleteThis is great!! Worst part would be clearing out all the stuff at my house. =)
I was thinking you had some posts on how to save your blog, but could not find it.
Am I thinking of someone else??
thanks and blessings
barbara jean
Very nice - now I need you to come and visit me so we can put one on my closet LOL Don't those ClosetMaid white brackets look like faces? Too funny!
ReplyDeleteYou did a fantastic job! And only $50!
ReplyDeleteAwesome Closet ideas! I am inspired to do mine now!
ReplyDeleteyay - over from tdc - seeing this closet redo all over again - isn't it awesome to have a fresh cleared closet space - well done! xo
ReplyDeletewww.NorthernCottage.net
Lovely closet.. I tell my hubby , you are pretty lucky that I am SO excited about built ins,other women would want Diamonds :-0
ReplyDelete