Welcome to the Workshop Series brought to you by


Funky Junk Interiors and Mustard Seed Creations!
Today Miss Mustard Seed is leading Part 4 of her decorative painting seminar. She's going to show you how to blend colours to create amazing highlights and details. This week your painting comes to life so don't miss it!
First, let's get started with Funky Junk's series,
Creating your own Workshop
Creating your own Workshop
Entire series to date HERE
4. Search for inspiration and ideas
5. Develop your plan
6. Go shopping
7. Install
Part 4: Searching for inspiration and ideas
(sorry for audio issues, still on the learn here)
(watch larger version on Vimeo)
1. Work surfaces


cans staggered


Part 4: Searching for inspiration and ideas
(sorry for audio issues, still on the learn here)
(watch larger version on Vimeo)
Honestly, shopping for inspiration for workshops is exactly like decorating your home. If you're looking for creative solutions without high costs, do as you do for your livingroom. Visiting your nearest thrift (to help support a good cause) will only lead you to a unique setup. How cool is that?
Ideas for setups and storage can be found anywhere. Internet, magazines, friend's shops, books, thrift stores, you name it. As you can see by the video, I didn't have the best of luck finding realistic garage type solutions online, however if you have some good net inspiration, feel free to share the link with your comment. :)
However, for crafters/sewers?!? My first workshop post HERE covered that quite nicely in one fell swoop! (Lucky you!)
However, for crafters/sewers?!? My first workshop post HERE covered that quite nicely in one fell swoop! (Lucky you!)
When figuring out what I wanted for my own workshop, I personally have found the best garage type inspiration looking through woodworking magazines. Great ideas? Ohhhh yeah. However, those types of setups will cost you some investment money.
So this is what I suggest. Before taking the financial plunge for the ultimate, consider what YOU already have FIRST. The price is free. Shop around your place and consider:
So this is what I suggest. Before taking the financial plunge for the ultimate, consider what YOU already have FIRST. The price is free. Shop around your place and consider:
1. Work surfaces
2. Containers
3. Space saving ideas
4. Adding your own flair
Here. Allow me to show you what I mean.
1. Work surfaces

old metal ironing board
Got one of these kicking around? Fabulous short order table top for most anything in a pinch. Lightweight, collapsible, compact, adjustable height, what more could you desire? This is my old one, which are sold cheap in any thrift.

ladders and boards
If you need a quick temporary shelving system for all your stuff, boards and ladders will get you there. An instant portable workbench even way out in the middle of your lawn.

I'll admit, I inspired myself with that ladder idea so this is what I did yesterday at work! Sure beat lugging a heavy table around for such a short required timespan. Collapsible sawhorses are another good fix for this one.

collapsible table
Need something a little more permanent but not so permanent? Folding tables clean up well, collapse, are sturdy, and come in a variety of sizes. I get mine from Costco.

a whatever base with a whatever top #1
This dresser serves many purposes in my eyes. Other than the obvious storage, the top has a very unusual wide overhang which is perfect for clamping things down.


But add a couple of shelving boards on top, you now have a long and narrow worktable right smack dab in the middle of a single car garage, with still enough room to walk around.


a whatever base with a whatever top #2
This is an old cupboard in which I found two. Picture a board across the top and you have a customized workstation that can go virtually anywhere. All 3 pieces were $10 from the thrift.
2. Storage
I prefer my storage to be mobile whenever possible. This makes bringing the items to your given project more efficient.

buckets and containers
Doesn't get much simpler than this. I hoard yogurt containers and their lids for paint too.

boxes, totes, tool boxes
This is how I store screws, nails etc IN my cupboards. When you need something, you take out the whole box. I prefer a simple cardboard box with screws in their original containers so you know the size and type they are.


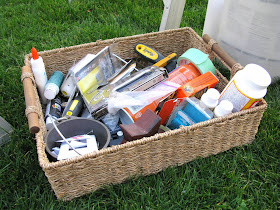
baskets and totes of any kind
Working on the run? When working on a project that's not in the workshop, I like trays or totes. They're easy to transport and keep everything in it's place, even when placed in the middle of a kitchen table. When the project is done, everything goes back to it's orginal home.
3. Space saving ideas

high shelving
Utilize unused space and think up. See how high this shelf is? There's enough space for 2 cans high, which clears head room for the work station directly below.

cans staggered
Here the cans are staggered to increase space efficiency.

layering storage
The wood storage is layered vertically behind a work table, yet all is still very accessible. Two for the price of one!
Originality
Just remember, most anything with cubbies or shelves or a top can be a productive part of your workshop. I am personally using a chicken coop (in which MMS has seen) of all things to store some tools! I think I need to leave my funky surprise for the final reveal. How devious is that?!? :)
Have I convinced you that you don't need anything too special to set up your workshop? Think function first, and the rest will follow.
ME - "So Miss Mustard Seed, do you have any tips on what you use in your workshop that is very effective and has cost you very little? How about something totally outside of the box original?
MMS - ""Our workshop is a mess right now and I'm afraid it's going to stay that way until we get some warmer temperatures here. (I can't believe how green your grass is! And you're in Canada? The frozen north?)
ME - "We don't have real winters in Canada's banana belt. Just pretend ones that last one day. I guess I overlooked that small detail when implementing this creating a workshop idea. Oops!

MMS - "One solution we've implemented in our workshop was using cinderblocks and boards for shelving. We needed a lot of shelving for all of my paint, sand paper, equipment, etc. Shelving can be expensive, but boards and cinderblocks are cheap. It's sturdy and provides loads of storage."
"I also look for cabinets, shelving, pegboard, and work surfaces whenever I'm out at yardsales. I've found a $5.00 vintage kitchen cabinet that's perfect for hardware storage, a $5.00 plastic shelving unit, and $2.50 sheets of pegboard (with the UVA emblem...go Hoos!) We were also fortunate enough to have 3 work benches convey when we purchased our house, so we have a pretty nice set up."
ME - "Ahhh I remember cinder blocks! I created a shelving unit out of them at a previous workplace. My fav part was how easy it was to customize to the required size in a jiffy!"
MMS - "By the way, Donna, I love the ironing board idea and your chicken coop.Very clever!"
Next time:
#5. Developing your plan
I'll go over:
- tips to consider when mounting permanent fixtures, such as cabinets
- lighting quirks
- easy way to mount anything to drywall, no matter how heavy the object is
Homework
1. Look for inspiration and ideas
a) Shop at home first, and gather up:
storage solutions
containers
table tops
bases
b) Seek other sources for inspiration
magazines
friends' workshop
internet
books
thrift stores
c) Consider:
1. Unusual and quick work surfaces
2. Mobile containers
3. Space saving ideas
4. Adding your own flair
Your turn!
In comments, let's hear...
*Where are you at with your own workshop progress this week?
*What do you have right at home already that would be the perfect candidate for your new setup?
*Are you wishing upon stars for something awesome to get in particular?
If you have an update or inspirational link to share, feel free with your comment. We'd love to peek. :)
After your comments, head on over to Mustard Seed Creations. We're getting really fancy with that paint now. :)

I can't believe I get to post first for the workshop!... I'm giddy with excitement.
ReplyDeleteI have been working away on my workspace
You can see it here
http://casual-cottage.blogspot.com/2010/02/punxsutawneys-prognostication-my.html
I am so glad that you started with this workshop series... I needed some inspiration.
"If this doesn't light your fire, then your woods all wet!"
I can not wait to see your reveal! I look forward to your videos each week now..the music is oh so groovy and yes I can be seen singing along {don't tell anyone} I started putting my craft room/workshop together about a month ago and am still working on it. Even though I jumped into it before your series began I find myself holding off finalizing the space because you keep posting some amazing ideas and inspiration. Thank you!
ReplyDeleteI loved your video and am looking forward to your reveal. I have gotten as far as picking my workspace area. I am still in the purging mode. Then a freelance job showed up...so work took over. LOL! Will get back to work soon. I am combining my workspace organization with the decorative painting techniques from Mustard Seed. woohoo! Should end up looking very cool!
ReplyDeleteThanks
Hugs
SueAnn
I am so stinking happy you are walking through this with us! I've picked my space - my laundry/pantry/storage for everything that has no place room. It's a major disaster zone right now. In process of having washer and dryer moved out. I'm feeling the cold too and it's just the excuse I need to procrastinate! I have also rearranged my work schedule so I have an extra day a week as potential "work on the workshop" time. It's a former kitchen, sans appliances so there are great storage and working spaces...just need to uncover them! You've broaden my horizons on looking for a "work table" - I was thinking a thrifted farmhouse table, but now see there are more possibilities. I'd like a tiny, cozy reading chair and lamp for one of the corners.
ReplyDeleteI really appreciate you doing this series!!
PS (I store my china in a chicken coop in my dining room!)
Canada? Banana Belt? Well I didn't know that. Hello from Pitt Meadows.
ReplyDeleteNow I know you are close enough to come over and organize my mess.
First, I gotta know! Did you set up your camera on a shelf at the Thrift Store and did anyone notice? Bravo!!!!
ReplyDeleteAlso, I was noticing that you didn't have snow either. Scratching head here! I always thought Canada was white until May!
Here's a link that help me out. I missed her party on Monday. Oh how I tried! And almost cried!
http://oursuburbancottage.blogspot.com/2010/01/party-organization-for-luffs.html
I'm almost ready to show you my room. I think you'll be proud! I got up real early this morning to go and look at it! I'm stupid like that!
LOVE YOU BIG!
Weeeee you guys are really doing this?!? Cool!
ReplyDeleteLori E, I'm only 30 min from you but you have to try and catch me first in order to get me to organize another's mess. ;)
Kolein, yup, I put the camera on any shelf I could find. Basically I just visualized what I wanted to see on camera and made it work. I tried to move quickly so most shots were done just once. I had a few curious stares and explained my plight to a couple clerks. One of them wants the link so he can see how it all turned out. I was a runnin' proppin' fool. But then again I don't care about being a fool. :)
At some point I should do a behind the scenes shoot because what happens around me while making these is funnier than the videos themselves...
If you want to post occasional updates, feel free! But think about saving final reveals for when the series is done so we can have a big kapow of them!
FJ Donna
I'm still working away on my workroom as well, but because I moved, not because you forced me to. haha. Although, you have kinda given me the kick in the backside to actually get it finished.
ReplyDeleteSee my progress here: http://makeminebeautiful.blogspot.com/2010/02/progress-in-workroom.html
I'm loving your workshop series, and I too look forward to your funny little videos. You do such a great job with those.
Back to work for me!
Hello there Donna... you are in the better part of Canada, I live in the other part where it is white until May... LOL I am so praying for an early spring... I detest winter.
ReplyDeleteWell Donna you have lit my fire under me... I purged, I cleaned, I vacumned and I even took took the stuff to the thrift store today... I found a fab piece today that worked out perfectly... things are actually coming together nicely... thanks so much for the inspiration and getting me off my big butt to do this... it has been fun so far and I actually have a spot to work now where it is WARM... I posted a couple of little peekers on my blog tonight just scroll down to the last couple of pics...
Hugs Deb
material girl!! i love love love your video. you are so inspiring!
ReplyDeletekitty litter buckets! they have handles! they have lids! they're sturdy! paintable! decoupage-able! LARGE!
ReplyDeletei use my litter buckets for:
the set of garage tools
sprinkler fixing needs
leftover concrete
electric sander and accoutrements
electric drill and parts
workshop rags
my dirty kitchen linens
and those are just the ones for the garage :)
This video was fantastic, Donna; I enjoyed every moment!! Well... until you didn't share the reveal! HaHa! What a terrific way to get us all excited!! Now I'm off to search through you blog - from Feb 12 to now - looking for the end result!!
ReplyDeleteVictoria