
When I first started blogging, I didn't mess much with the photos. I was in a hurry. Pics and posts took ALOT of time that I didn't have.
My decorating ideas have some merit, but when my artist friend paid me a personal visit to my home, he pointed out that I wasn't showing my work to it's fullest advantage. That my photos didn't do ANY of my work justice.
My decorating ideas have some merit, but when my artist friend paid me a personal visit to my home, he pointed out that I wasn't showing my work to it's fullest advantage. That my photos didn't do ANY of my work justice.
And it wasn't that they were bad shots per say. However, I didn't tweak them to enhance them.
I personally load all my digital pics into Picasa, a free software editing program. His option is that it isn't enough for REALLY good pictures to represent your work. And then he pointed out why. Yellow castings in dimly lit rooms, out of focus shots... you can change all this with Picasa, but Photoshop is simply a major professional step up.
I'll be honest. I'm still using Picasa but will soon morph into photo shop land. But that's because, I've now surpassed what Picasa has to offer. When you know you've reached the limit to something, you know you are growing!
Good photos don't completely rely on tweaks though. Consider some of these other tips that I utilize each time I snap.

1. Care about good photos
I know. I'm busy too. But honestly, when I blog browse and the photos are dark or lousy, I scroll through the post very quickly. Photos truly inspire. And if we don't like what we're looking at, we aren't likely to be inspired or even LIKE the project.

2. Try different angles.
Don't stop at one attempt. Take a few. Some shots need to be straight on. Some on an angle. Some taken on your knees. And then crop them before posting. Always crop them. I took this bench photo about 5 times and only kept this one.I then cropped, straightened, brightened, and added blue to an otherwise grey sky. Crazy, eh?

3. Get on your knees.
Did you know that if you take a photo lower to the ground, your object seems larger? Try it outside. Get down on your knees, and the sky becomes your background, not your neighbour's shed.

4. Pay attention to your background.
See #3. Plus keep trying angles with your background in mind. If possible indoors, move stuff around to help enhance your current photo. Trust me. I do it all the time. I took this shot about 6 times. On another angle I kept getting the patio in the background with my laundry flapping in the breeze.
See #3. Plus keep trying angles with your background in mind. If possible indoors, move stuff around to help enhance your current photo. Trust me. I do it all the time. I took this shot about 6 times. On another angle I kept getting the patio in the background with my laundry flapping in the breeze.

5. Would you buy that painting?
Think in terms of your picture being inside a frame in a store. Would you buy it? If not, try again. With the right angle and depending on how close you get, anything can look amazing. Pretend you are drawing your objects in. This pic was saturated with colour, then a haze added to cast a dreamy glow.
6. Edit and enhance!
I was hard pressed to find a photo I kept that I didn't enhance! A photo straight out of a camera is not a pretty thing. And oh my goodness, please sharpen and straighten up those photos! Some of mine come out so fuzzy and crooked! Start small and download Picasa and start playing. It only takes a few seconds to play with a photo. If you want to portray professionalism, do the work.

7. Get up close.
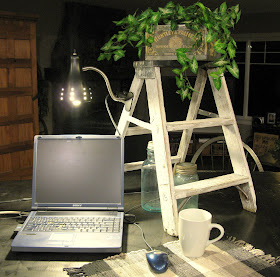
Getting close really shows more detail. Computer screens are small. Take in account how small your pics are that are being posted. Small screen, small pics, extra small viewing area. To show what you're talking about, get right in there. And when you think you're close enough, do it once more. Push it and see what happens. You can always back up again. In this pic I could have gotten much closer to show the detail on the hooks. My aim in this one was to simply capture the transition of closer to farther away in silhouette form. Figure out your goal, then implement it.
8. Enough lighting.
Interior pics always have a dark cast. But notice how professional photos never do? That's because they use proper lighting casted in the direction of your object. Clicking on lights in your room or opening your windows is generally NOT enough. I at times bring in my lamp tree from the garage. You know, those ugly pole things with two bright hot lights on top. Also, try not to get a shot of your lights on in the pics. But if you do, replace the wattage for something lower. The bulb in this photo was too strong, therefore hard on the eyes. (photo was taken with a lamp tree in a dark room to help illustrate the lamp glow) IMPORTANT: finish tweaking your lighting in your software. EACH TIME. You will be stunned at the difference!

9. Watch those funky angles!
The hottest trick these days is to purposely take pics on an angle. I do it if it enhances the pic, capturing areas in the photo otherwise missed for the shot, or to simply add abit of mixed up interest in a shoot. But you can take it too far. You don't want to feel like you're falling off the side of a mountain. Gentle angles can work. Harsh angles annoy and make viewers dizzy. Easy does it!

10. Turn off the flash.
Turn it off and never use it again! Your colours will be soooo true! For proper lighting, see #8. At night may be a different story. While the fire provided a wonderful glow on it's own, I did use a flashlight to light up the stick so it would show. But 99% of my photos are done with no flash.
Learning the settings on your camera and what they can do is also important. Read blogs that talk about photoshop and camera settings and learn about what your camera can actually do for you. I highly recommend set aside a part of your leisure time (haha good one eh?) and start on page one, and then experiement. Digital cameras are so fun to play with!
Having a good eye for photos indeed makes all the diff in the world too. However, anyone can improve from where they're at with a bit of practice.
And my last bit of advice? Break all these rules and make up your own. Experiment. Have fun! But love what you see so others can appreciate it too!
Now it's your turn! What are your thoughts on all this? And please share if you have any tips on how we can all take better photos! I have ALOT to learn!
Thanks so much for the advice.
ReplyDeleteA few months ago we bought a new DC. It was the first in 8 years. You can imagine what that was like.
This camera has so much going on that I get lost. I still need to sit down and really read the instructions. I see all this pics on the blogs and they look so good and mine look average or below.
Thanks again for taking the time to give us some advice. I did learn some things.
Willow
You can also try picnik.com if you do not want to download anyting to your computer but still want to try photo editing software.
ReplyDeleteAnd I must agree, photos can make a post. I hate reading about some awesome project and then scrolling down to find pictures that are too dark to see said project. Argghh!!
Great tips and your photos always look great.
ReplyDeleteOh my gosh - thank you SO MUCH!!! I have tried REPEATEDLY to get the right photos of things in my house and to no avail!!! So, I will take your tips and try again!!!
ReplyDeleteThanks Again! I love your blog and you ALWAYS have great photos!!!
I'm sure you've inspired more than a few to take advantage of your advice! Thanks. Your photos ARE great...
ReplyDelete:-) Sue
GREAT tips!! I've been trying a lot of different angles lately. I recently discovered that your pictures really are better without the flash! I've always been a picture person but never really took the time to TRY and take a great photo. I just shot what I shot. Some turned out great and some not so much! I'll be sure to keep your tips in mind from now on!
ReplyDeleteGreat advice. I think my photos are improving as I go with trial and error but I know they overall need MAJOR improvement! Sometimes I just snap and go for the sake of time. I hate to post it but I do anyway - shame on me. I have been saving up for photo shop and wasn't even aware of free editing software. BTW - a pic in my post today was on a funky angle on purpose to show that my life is out of balance. What if people don't get that - ha ha ha! Oh well.
ReplyDeleteOh man, I was so worried that this would be such a boring topic that everyone would vanish and remove themselves from this place. LOL
ReplyDeleteAngie, you make a GREAT point.
I ADORE taking photos. And there is indeed such a difference from simply snapping a picture of a flowergarden, and snapping a pic of one flower in just such a way that you feel like you're right there.
Take the regular type pic, but try and think 'fancy' each time. You'll be amazed what that little push will do! Best part of all, you can delete all but one! The digital era has really done wonders in that regard!
Funky Junk Donna
Thanks for these tips. I am struggling with my blog photos, so I appreciate it.
ReplyDeleteDigital has opened up so many options, but I am still having a hard time translating my old film play with it in the darkroom style to the digital world. It is very different!
Great tips, I agree with you on all of them. I know when I see cool photos on blogs, it is what makes the blog and their stories/products/information shine. I have a Nikon D40 and use Picnik and Picasa, no Photoshop, and no plans to purchase or learn it soon. I am happy with the editing I can do with the free programs, since I am not a professional photographer. One other recommendation, a good macro lens for indoor shots in poor lighting....one with a low f-stop that won't require as many lamps to set up! I don't have one yet, but it's on my wish list! :)
ReplyDeletep.s. I am the queen of quirky angles...I was beginning to think I stand crooked with all of the weird angles and crops I always end up with! :)
This isn't boring at all! In fact, it is very helpful. I am currently using Picasa and am fairly pleased, but I have heard a lot about picnik and I may try that. Maybe I will get brave and try photoshop! I hope you will post about photoshop when you start using it. And especially tips!
ReplyDeleteThanks so much.
I appreciate your advice SO much. Now I need a better camera! Thanks again.
ReplyDeleteThank you I am in need of these! I need a new camera too, but it is not in the budget right now. These fantastic tips will help.
ReplyDeleteGreat tips...loved the post. Thanks for sharing...I am out of luck right now on my blog as my camera is "down in the dumps" LITERALLY! I am so lost! Somebody please help me. Hope to have a new one in a couple of days...thanks so much for having an awesome blog...have a blessed weekend! Oh! LOVE your kitchen re-do! YUMMY!
ReplyDeleteDonna these are great hints! I just bought a new camera and we are still in the honeymoon phase ~ I am still getting to know "her". I will save this post and refer back to it.
ReplyDeleteYou do take great pics. The only other advice I would give is to not overdo it. The pics with the faded edges get old and I don't even look at them and now I know who always, always does that so I don't even go to their blogs anymore. Also, closeups are fun but if showing a home project, I want to see how it looks in the home. I want to see the surroundings. Especially if it's a makeover. All that said, I am terrible at fixing my pics but I'm trying to improve. Thanks for all the great advice.
ReplyDeleteWonderful tips!
ReplyDeleteAmy
Great information! We live in the generally dreary NW...so winter pix are tricky. I use Picassa allll the time and only learned about the "NO FLASH" rule recently...what a difference that made. You've helped me a lot...I'm going to put these tips to use...I NEED them!
ReplyDeleteBlessings,
Spencer
Great tips! It is amazing what just changing the angle you take a photo can make! And a little cropping never hurt either! ;D
ReplyDeleteThank you tons! I am always looking for tips on photos. I try very hard to take good pictures, and I also hardly ever use the flash. My camera can do so much and I just haven't had the time to read all about it. I will, however, be checking out the photo enhancing sites listed here.
ReplyDeleteThanks a million,
~Misti
Thanks so much for this post! It is really helpful for me. I have been wanting to improve my photo taking skills.
ReplyDeleteI use my daughter's very first digital camera, and really need a new one. Any thoughts on cameras not costing $400?
Mary Lou
Had to share your suggestions w/my daughter-in-law, who is still breaking in her new "cheeky, "highflutin`"La de Da" camera.
ReplyDeleteShe has a natural gift for that stuff, but any little bit helps.
Thanks for sharing, Rosycheeks
What a great post! Thanks!
ReplyDeleteDo you have any tips for dimmly lit rooms? My son's room only has one window and it faces north, so not a ton of light in there. I can never get the photos I take in his room to turn out.
Mary Lou, it's my opinion that the better the camera, the better the pics. You can get by nicely with a $400 camera for much less than that from Costco when they clear them out. If you spend anything over that, it's time to get a REAL camera with interchangeable lenses. But that's a totally different animal all together. And a world I hope to join someday! I have one of those $400 but sold for $250ish from Costco btw. :)
ReplyDeleteLindsay, for dimly lit rooms, #8 pretty much says it all. Just add some extra lighting shining behind you to take pics. Lamp trees or flood lights all help. Play around with where you need to shot vs. where the light is shining to avoid the most shadows. Lamps on either side of you may also work too.
Also, for poor lighting, go into your camera options and manual and figure out the wonderful world of aperture. It's a lens setting that allows more or less light into your picture.
For more light, you'll need to hold your camera ultra steady because the lens needs to stay open longer to allow in more light, which can result in a blurry pic. You can steady your camera on an object, tripod, or stand with your legs far apart, and with both hands on your camera, lean your elbows against your body for more stability.
If anyone finds they've improved their photography from any of these tips, I'd love to hear about it! Be sure to come on back and let me know with a link so I can peek! :)
Have fun!
Funky Junk Donna
Hi, I just found you. And I love your blog! When I started blogging, it didn't take me long (nearly two years ago) to figure out that photos is what is near and dear to my heart. I NEVER use flash. Hate to see people do that. Ruins the photo, in my opinion. I don't usually crop much, but now you've inspired me. Also, I write my blog posts on Windows Live Writer. SOOO much easier to get your photos to look better and bigger, and so much easier to post period. Google it and you can check it out if you haven't already, and you can download it free!
ReplyDeleteBrenda
Wow! What a great post. I really don't do a good job with my photos and this info is really helpful. I'm going to take it to heart and make it more of a priority. Thanks for the inspiration.
ReplyDeleteMidge
Brenda, I've just downloaded Windows Live Writer and will experiement with it with my next post. Looks interesting! Thanks!
ReplyDeleteI'm fussy about the typography spacing in between photos and that part was always soooo glitchy in blogger. So, thanks!
Funky Junk Donna
Thanks so much for your tips. I am somewhat of a newbie to blogging, and have noticed that the blogs I am drawn to contain good pictures. As a result, I have learned to love photography. Some day I hope to have an SLR camera, but for now I am trying to learn everything I can about taking good pictures with my point and shoot. Your thoughts have been very helpful!
ReplyDeleteThanks sooooo much for taking the time to advise us out here in Blogland. This photo business is still a huge shortcoming for me but with great tips and encouragement like this, I'm gonna keep trying!
ReplyDeleteGrins!
Pamm
Love this post- I just took the plunge to dslr and my goal is to be able to use manual as easily as I use the auto focus. Hmmm- better get working!
ReplyDeleteThanks for the tips, the perspective and a smile each time I visit.
Carolyn
There's not much more I can say except add an addition thanks for your expertise. Tips coming from an expert like you are worth saving!
ReplyDeleteI'm new to your blog and LOVE it. Thanks for this post. I still use point and shoot and hoping for Christmas to get the DSLR I so often drool over. I also use Picasa. I downloaded the free Photoshop trial and couldn't figure out a stinkin' thing. Once you start using Photoshop, will you keep us all posted with some tutorials? I mean, the simplest of simple!
ReplyDeleteBTW, you take great pics!!!
Great tips! I do a lot of food shots (duh) and use my trusty LED book lights... it brightens up a shot.
ReplyDeleteI'm putting you on my fresh links (not sausage links) so I'll know where to find you! Come by for some sweet tea.
Thanks for the tips. I'm never all that happy with my pics. I don't use any kind of editing software, so I'll have to check out some mentioned here.
ReplyDeleteThanks so much for these tips, Donna! I just got a new camera and also just found Picasa, so I'm going to try to work on the photos that I take. I'm so excited to use my new camera, but it's all foreign to me so it will take a while to learn I'm sure. Do you have any tips on how to load your photos larger in Blogger? I know how to change the pixel size once they're in but that seems to take them out of focus and make them grainy. Just curious...
ReplyDeleteOH, why didn't I see this post earlier! I must read each and every one of your posts. Want to let you know that I send a BIG THANK YOU your way in my most recent post! This is such great information! Thanks for sharing!
ReplyDeleteAll great tips! Thanks! But I have one question, maybe I'm missing something, I don't know, but how do you put your blog name on your pictures?
ReplyDeleteDonna, I heard from you and Susan on naps on the porch that you should try to use only natural light. WOW. never knew that, and grew up with a photo maniac for a dad who was always flashing our eyes out with his pics! I use a yardstick or a drapery tube and even a broom stick to steady my camera on to get a sure shot instead of a tripod. Boy it makes a difference!
ReplyDeleteHi Donna
ReplyDeleteI am new to blogging and I found your blog from an interview you did on the The Nester. I have spent the last hour and half on your blog reviewing all of your blogging tips. Wonderful information,especially the "no flash" tip! My photos need a lot of work:) Thanks for providing such a great resource of information for beginner bloggers.
Have a wonderful evening
Kim